My younger brother Callum is, affectionately, a computer nerd.
For his 18th Birthday this past April, I wanted to make him a computer-styled cake... as I'm a total novice cake decorator a fair amount of artistic licence was employed... but the basic idea was there... and the cake tasted good!
"Cake" in the broad sense of the word - it was in fact 2 layers of brownie and one layer of blondie... From each layer I cut a circle which I then shoved into another layer so that each was two toned:
 |
| Milk Brownie into a Blondie layer... |
 |
| ... Dark Brownie into a Milk Brownie layer... |
 |
| ... and a Blondie circle in a Dark Brownie layer. |
Yes... I deliberately off-centred some of the circles - I thought that'd make it all look more awesome! :)
Each layer was sandwiched to the next with chocolate, cream cheese frosting - Callum's favourite....
Then - I coated the whole cake with the chocolate frosting, save for the very top which I used green frosting left over from when I made the carrot cupcake I have yet to upload... Woops!
Did I do a crumb coat? No.
Should I have? Probably.
Did I fridge/freeze the cake before frosting? No.
Should I have? Yeeeah... Probably.
Will I do so in future? If I remember...
Does the world end if you forget these steps? Apparently not.
I wanted the top of the cake to look like a computer chip/board... thing. Hence - the green icing... over the green I drew little yellow lines in square-ish patterns with writing icing, I tried to use buttercream, but I had issues... and I made the "connections" out of little silver cachous.
 |
| At the centre top, you can see the failed buttercream... but doesn't it look a little computer chip like...? If you don't know what computer chips actually look like... ;) |
The chocolate chips around the edge are to hide the join between the brown and green icings.
Finally, around the vertical edge, I used tempered, white chocolate to make the binary number 0100 0011 which is the combination used to denote the letter 'C'... I tempered the chocolate to stop it blooming, and to give it snap - it's not a particularly difficult process... I might go into detail, one-day... maybe... :)
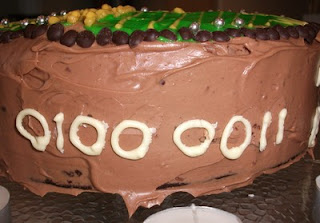 |
| Mad piping skills right there... Not. |
Further reason behind the tempering of the chocolate was - I hoped it'd hold up better when I ferried it from waxed paper to cake surface... All in all, I feel it was a success!
 |
| This is was the cake looked like from the inside after all that circling and shoving... |
 |
| The final product - not bad, in my opinion! |
Below, at long last I give you the recipe for the brownies... Each layer was played around with a little... next to no (brown) sugar and less butter than the original for the white layer (with extra vanilla), 1/4 as much sugar as called for for the milk layer, half as much sugar and butter for the dark... etc... For once, though, I'm going to share the original recipe... which came from a recipe book written by a family friend, Rosie Mitchell.


