So the trimester is coming to an end... Exams are looming, study is being avoided and Kat is inventory-ing the cupboards trying to work out how to use what's left lingering without having to buy in more...
Hmmm... now, I have a tin of evaporated milk. I can remember that I bought it for a recipe but that I never got around to using it... But now, not only can I not remember which recipe it was for, but looking through my books I can even work out which recipe it might be.
Pair this with some yummy home-grown oranges that my Mummy sent me back to Wellington with at the beginning of this term... They were delicious until they got to the point where they were too rip for Kats to eat... I'm real picky about fruit, unfortunately!
There wasn't anything out there that exactly replicated what I wanted, so I had to do some creative developing of my own... But the results were pretty spectacular, if I do say so myself...
Not bad for a cake made out of cupboard scrapings!
Recipe after the jump...
Here's what you need:
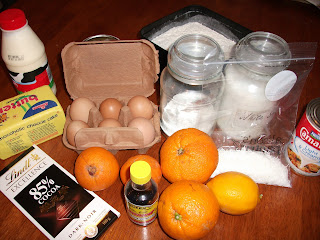 For the Cake:
2 cups white flour
1 cup white sugar
2 tsp baking powder
2 Tbsp shredded (or dessicated) coconut
2 Oranges worth of zest (I don't have a zester and had to forgo that bit, but I think that a little zest would make the cake even better)
2 tsp vanilla
3 eggs
1/3 cup orange juice (I used fresh squeezed with a little lemon, but store-bought will probably work too!)
50g butter, melted
1 cup evaporated milk
For the Cream Curd Filling/Frosting:
3 eggs
2 tsp vanilla
1/2 cup sugar
3/4 cup orange juice (same story as before...)
2 more oranges worth zest (see previous story...)
1 cup cream, whipped
To decorate:
1/2 cake Lindt 85% Chocolate, melted
A little extra coconut
Method:
Set oven to 180 degrees C and grease your tin - mine is rectangular.
Sift to mix dry ingredients and stir through zest and coconut.
Make a well in the dry ingredients before adding all wet ingredients.
Fold wet ingredients into dry until well combined without flour/baking powder lumps... (Ew!)
Pour the mix into your prepared tin(s) and bung it in the oven for 35ish minutes, or until an inserted knife/bamboo skewer comes out clean.
While the cake is cooking begin to prepare the Orange Curd for the filling/frosting...
In a saucepan, over low heat, beat the final 3 eggs, 2 tsp vanilla, 1/2 cup sugar and 3/4 cup orange juice and the last of the zest, if using. Stir continuously until the mixture begins to thicken and coats the back of a clean spoon when dipped into the mixture... This took me about 20 minutes, but it could take you as little as 10 or as many as 30!
Allow to cool before folding into the whipped cream.
When the cake is cooked, pull it out the oven and allow to cool completely before you try to slice, fill or frost it!
Once your cake is cool, you can cut and fill/frost it. Because my cake was a fairly large rectangle and I wanted four layers, I first cut it into two vertically and then I cut each new rectangle in half horizontally = four layers!
Set your bottom layer on the serving platter and smear with the cream/curd filling. Top the the second layer and repeat until all four layers are stacked. I tried to use a plastic bag with the corner cut out as a piping bag, but ultimately I found it easier just to spread the filling with a knife...
I did, however, use my "piping bag" to pipe the frosting onto the top of the cake in a tight zig-zap pattern. I used a knife to spread on the sides though, because I don't possess the mad skills required to pipe the side onto the cake.
Finally, melt your chocolate in 30 burts in the microwave until smooth... DO NOT OVER COOK! Pour the chocolate into another plastic/piping bag or just drizzle over the cake off of the back of a spoon. Sprinkle with coconut and voila!
One gorgeous, cupboard scraping cake - DONE!
You don't need to serve the cake with anything other than what is on the plate - you've already got the cream sorted!
My Uncle and friends (for whom I made this cake) thought it was amazing! I thought the taste a little subtle, and the texture a little stodgy... But the zest should improve the taste, and I'm sure that a more experienced baker than myself could give me a heads up as to what to do about the texture?
Until next time...
Hmmm... now, I have a tin of evaporated milk. I can remember that I bought it for a recipe but that I never got around to using it... But now, not only can I not remember which recipe it was for, but looking through my books I can even work out which recipe it might be.
Pair this with some yummy home-grown oranges that my Mummy sent me back to Wellington with at the beginning of this term... They were delicious until they got to the point where they were too rip for Kats to eat... I'm real picky about fruit, unfortunately!
Chuck in some Google searching and this is what you get...
 |
| The finished product: a four layer Orange, Coconut and Evaporated Milk Cake with Orange Curd Cream filling/frosting drizzled with 85% Cocoa Solid Chocolate to cut the sweetness. |
Not bad for a cake made out of cupboard scrapings!
Recipe after the jump...
Here's what you need:

2 cups white flour
1 cup white sugar
2 tsp baking powder
2 Tbsp shredded (or dessicated) coconut
2 Oranges worth of zest (I don't have a zester and had to forgo that bit, but I think that a little zest would make the cake even better)
2 tsp vanilla
3 eggs
1/3 cup orange juice (I used fresh squeezed with a little lemon, but store-bought will probably work too!)
50g butter, melted
1 cup evaporated milk
For the Cream Curd Filling/Frosting:
3 eggs
2 tsp vanilla
1/2 cup sugar
3/4 cup orange juice (same story as before...)
2 more oranges worth zest (see previous story...)
1 cup cream, whipped
To decorate:
1/2 cake Lindt 85% Chocolate, melted
A little extra coconut
Method:
Set oven to 180 degrees C and grease your tin - mine is rectangular.
Sift to mix dry ingredients and stir through zest and coconut.
Make a well in the dry ingredients before adding all wet ingredients.
 |
| Mixing wet and dry ingredients. |
Pour the mix into your prepared tin(s) and bung it in the oven for 35ish minutes, or until an inserted knife/bamboo skewer comes out clean.
 |
| Going into the hot oven... |
In a saucepan, over low heat, beat the final 3 eggs, 2 tsp vanilla, 1/2 cup sugar and 3/4 cup orange juice and the last of the zest, if using. Stir continuously until the mixture begins to thicken and coats the back of a clean spoon when dipped into the mixture... This took me about 20 minutes, but it could take you as little as 10 or as many as 30!
 |
| Whisk, whisk, whisk... |
 |
| Fold, fold, fold... |
 |
| Yes... My cake is sitting on an up-turned dish rack... I'm a poor student! I've gotta make the most of what I have! :) |
Set your bottom layer on the serving platter and smear with the cream/curd filling. Top the the second layer and repeat until all four layers are stacked. I tried to use a plastic bag with the corner cut out as a piping bag, but ultimately I found it easier just to spread the filling with a knife...
I did, however, use my "piping bag" to pipe the frosting onto the top of the cake in a tight zig-zap pattern. I used a knife to spread on the sides though, because I don't possess the mad skills required to pipe the side onto the cake.
Finally, melt your chocolate in 30 burts in the microwave until smooth... DO NOT OVER COOK! Pour the chocolate into another plastic/piping bag or just drizzle over the cake off of the back of a spoon. Sprinkle with coconut and voila!
 |
| Cake - all finished and un-cut! |
You don't need to serve the cake with anything other than what is on the plate - you've already got the cream sorted!
My Uncle and friends (for whom I made this cake) thought it was amazing! I thought the taste a little subtle, and the texture a little stodgy... But the zest should improve the taste, and I'm sure that a more experienced baker than myself could give me a heads up as to what to do about the texture?
Until next time...
This sounds AMAAAZING. Have to try it!!
ReplyDelete